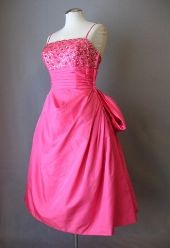
The popularity of 1950s full skirted dresses has been on the wane for the last few months, but I now find that they are coming back in a big way with one significant difference. Women who wear this style now prefer to wear their full skirted dresses without crinolines. They want the swish of a full skirt without the fullness of a petticoat.
For that reason, I will be photographing 1950s dresses both ways for you so you can see how they look when worn with and without that slip. This 1950s Suzy Perette dress is a great example of how a 50s dress can look great no matter how you choose to wear it.
Here's another example of how the look changes with a crinoline and without.
What is your preference when wearing 50s dresses? With or without?
Showing posts with label 1950s dress. Show all posts
Tuesday, July 16, 2013
Thursday, May 02, 2013
How to Restore the Back Darts in a 1950s Dress
Before the late 1960s, when women kept their clothing and expected to wear each garment for years, it was common for them to make alterations when necessary instead of shopping for something new. An alteration I see frequently is the removal of the vertical darts in the back of a dress to add inches to the waist. While this does work, it also brings the side seams forward on the body and the dress won't curve to fit the small of the back like it would with darts in place. I always prefer to restore the darts if they have been removed so the dress hangs and fits like it was originally meant to. If your dress doesn't have a waist seam, simply resew the darts along the original stitching lines. If your dress does have a waist seam, however, restoring those darts requires a few extra steps.
The alteration is fairly easy to recognize because you'll often see the original needle marks or press lines in the fabric. On some dresses, you may see tiny holes at the point of the dart and at a midpoint along each leg. These were the original dart markings for the stitchers in the factory.
On this particular dress, the original owner also added room at the back by taking out the zipper placket so the zipper was exposed. I'm going to fix that too. If the zipper is still in the original place on your dress and you can rework the waist seam without removing it, simply ignore the references to the zipper in these steps.
Step 1 is to open up the waist seam below the dart and for about 2" on either side of it. If you need to, unstitch the zipper to just below the waist seam as well.
Repin the dart along the original stitching lines. If you can't see needle marks, look closely for the original press lines in the fabric or the little holes that marked the darts originally. Stitch the dart back in place.
Press the dart flat, always toward the center back of the garment.
Now that I have the dart restored, you can see that the center back edges no longer match up. On this dress, in order to accommodate the extra length added in the waist, some of the depth of the inverted pleat was taken out which made that last pleat wider than all the rest. Your dress may have had gathers flattened, pleats entirely removed, or a matching dart in the skirt removed. Look for clues in the fabric. In this instance, I can just make out the original press line for the fold in the pleat. Restore whatever shaping was removed in your garment skirt section to make it match the darted bodice.
Sew up the waist seam again. Ahhh, now those pleats in the skirt look correct again!
Restitch the zipper in place if needed.
And voila! The dress is back to the original shape it was meant to be! This is a fairly simple fix if you have basic sewing knowledge.
Here she is in all her glory. You can see the deep pleats have been restored in the skirt and the bodice back now hugs the curve at the waist as it should. The restoration took me about 1/2 hour total because I also had to reset the zipper in this dress. I think it was a half hour well spent, don't you?
The alteration is fairly easy to recognize because you'll often see the original needle marks or press lines in the fabric. On some dresses, you may see tiny holes at the point of the dart and at a midpoint along each leg. These were the original dart markings for the stitchers in the factory.
On this particular dress, the original owner also added room at the back by taking out the zipper placket so the zipper was exposed. I'm going to fix that too. If the zipper is still in the original place on your dress and you can rework the waist seam without removing it, simply ignore the references to the zipper in these steps.
Step 1 is to open up the waist seam below the dart and for about 2" on either side of it. If you need to, unstitch the zipper to just below the waist seam as well.
Repin the dart along the original stitching lines. If you can't see needle marks, look closely for the original press lines in the fabric or the little holes that marked the darts originally. Stitch the dart back in place.
Press the dart flat, always toward the center back of the garment.
Now that I have the dart restored, you can see that the center back edges no longer match up. On this dress, in order to accommodate the extra length added in the waist, some of the depth of the inverted pleat was taken out which made that last pleat wider than all the rest. Your dress may have had gathers flattened, pleats entirely removed, or a matching dart in the skirt removed. Look for clues in the fabric. In this instance, I can just make out the original press line for the fold in the pleat. Restore whatever shaping was removed in your garment skirt section to make it match the darted bodice.
Sew up the waist seam again. Ahhh, now those pleats in the skirt look correct again!
Restitch the zipper in place if needed.
And voila! The dress is back to the original shape it was meant to be! This is a fairly simple fix if you have basic sewing knowledge.
Here she is in all her glory. You can see the deep pleats have been restored in the skirt and the bodice back now hugs the curve at the waist as it should. The restoration took me about 1/2 hour total because I also had to reset the zipper in this dress. I think it was a half hour well spent, don't you?
Labels:
1950s dress,
how to restore a dart,
sewing